From the Field: Designing custom PCBs with SparkFun
Over the next few weeks, we’ll be letting some of our customers take over the blog to talk about how they use their favorite SparkFun tools and products in their projects, businesses and everyday lives. The best part? All the SparkFun items on their wishlist will be on sale today only!
I think the first place any aspiring hardware/IoT maker finds themselves (after buying an Arduino or Raspberry Pi) is on the SparkFun website, browsing all the various sensors, breakout boards and tutorials available. I mean the options are endless! From sound, temperature, air quality and pressure sensors; to starter kits for Raspberry Pi, the Inventor’s Kit and Retro Arcade Gaming; to IR Cameras and LiDAR, the possibilities are amazing! And really, there isn’t a better place to begin than buying a sensor or a kit, wiring it all up on a breadboard, connecting it to an Arduino and watching it do something!
Scott’s wishlist (on sale today only!):
Who am I?
As a recent hardware enthusiast, I’ve mainly been working as a software developer and business owner for the last 15 years, and have been working with the latest technologies in my own start-up companies, SMEs and in large, publicly-traded companies. I’ve written software for machine learning (e.g. using Google’s Tensorflow), computer vision (e.g. OpenCV), IoT (Arduino and RPi) and Crypto-currencies (Bitcoin, Ethereum). But a couple of years ago, having just finished a software project and bought my first Arduino, I realised just how much I didn’t know about the hardware side of things! As a firm believer that there’s no better way to learn than to dive in at the deep end, I began working on an open source hardware project to get sensors and Sigfox built into an Arduino-style board, which I called Siguino.
Why the “Siguino” project?
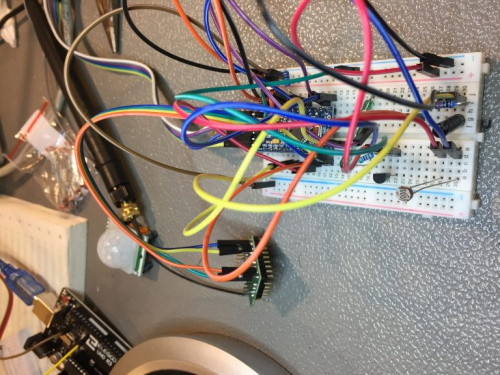
While I did end up buying and using many breakout boards and sample sensor kits, I realized that while it was cool to be able to get a temperature or humidity reading and send it over Sigfox via an Arduino Pro Mini, some SparkFun breakout boards, and a few wires and resistors, it was hard to go from there to what I considered a useful device or product – especially when the result looks like the below (yes, that really was sending temperature and light levels over Sigfox)!
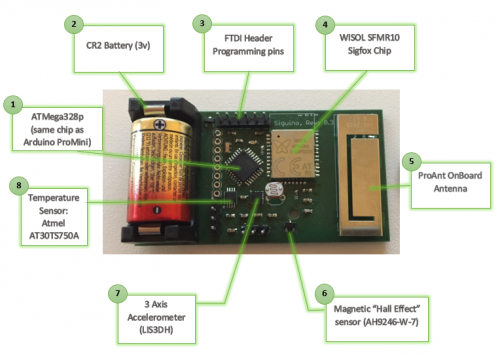
I wanted to learn how to design my own single board that both already had some useful sensors, and also had the Sigfox comms chip and antenna on board, so once power was supplied it was already a functioning device (re-programmable later on as needed). I also wanted to make this board open source, so others could build on it or learn from it. It was from this that the concept of the Siguino board arose, and ultimately led to a purpose-designed PCB that had all the components I wanted on board.
Siguino component breakdown
SparkFun resources:
I really could not have completed my open source project without the knowledge and array of products available on the SparkFun site. Here’s just a small sample of the products I used for this project:
- FTDI Header: an essential piece for programming Arduino Pro Mini (and similar) boards.
- Kits and sensors for testing: It’s often a very good idea to breadboard up a messy but functional solution (as I did for this project) using the extensive array of sensors available. Couple this with the availability of the underlying Eagle files, and you can essentially build out a working version of the hardware without ever taking out a soldering iron! Specifically, I used the temperature breakout, accelerometer and magnetometer.
- Adapter boards: When you get a bit deeper into the hardware and you find a particular chip that you want to try but don’t want to to send off a custom PCB for printing yet, definitely grab an adapter board. Most of the major chips you might want to use will likely be in a standard format, and the longer solder pads really help with the hand soldering, especially if you’re not a solder expert (yet!).
- “How to” guides on Eagle: These are absolutely excellent guides if you want to get into designing your own boards. Anyone enthusiastic enough to get a messy but functional breadboarded concept up and running can go on to design their own PCBs and this series is very informative and easy to follow.
- GitHub Eagle libs: Having all the SparkFun product schematics and Eagle designs available on GitHub is a very valuable resource. It’s easy to miss the need for a pull-up or pull-down resistor requirement when trawling through datasheets on various chips you might want to use, so to see the schematic of a working board you can test makes things very easy for the new hardware designer.
- Arduino code libraries: Programming/communicating with the various hardware chips (such as accelerometers, temperature chips, etc.) can involve a lot of searching though the chip datasheets for SPI/I2C/UART settings, commands, etc., so it’s very useful to have sample code written for Arduino for each of the SparkFun modules that sets you up to quickly make use of the hardware.
Product suggestions/improvements:
- Power analysis: As I was trying to build a ultra-low power board that would last on a battery for months, accurately determining both the constant as well as spiking power profile was very important, and it turns out this is trickier than you might imagine. In the end, it was a specialist board and software I found from Nordic Semi-conductor that worked the best given the micro power requirements I wanted to accurately measure (down to a few microamps), but this was not an easy module to work with, and I think there should be better solutions available for open source hardware building (a RPI shield or something?).
- RF analysis: Another very difficult thing to assess for the most part when dealing with radio comms (Sigfox, LoRa, Bluetooth, etc.) is whether or not the board is transmitting at the correct frequency and at what power level. Believe me, trying to tailor an RF net for your antenna and attempting to impedance-match your feed line is a dark art! Anyway, most RF analysers are made for professional hardware companies and come at a correspondingly high price point, but I found an independent device that works very well for an affordable price. It would be great to see it as an option on the SparkFun site.
- More mainstream low level components: I did occasionally find a SparkFun module for a purpose I was interested in (recently, the GPS breakout board, since my next project will incorporate GPS) where the underlying chip (in this case the SkyTraq Venus634FLPx) doesn’t seem readily available from many suppliers. There are a great many GPS chips from different manufacturers, so it would be great if chips that were more readily available were chosen for the SparkFun modules.
- Further chip adapter boards: I found the adapter boards for the standard SSOP chips very useful, but there is such a vast array of formats for the various chips (with SMD components in particular) from TQFP, QFN, VFLGA, etc., that it would be great of each of these were catered for also.
Final Thoughts
There are a lot of options available at SparkFun, both for the first-time hardware tinkerer (as I was at the start of my project) to the experience hardware engineer, and to those in the former category all I can recommend is to get stuck in building something! Then, if you want to take it further, check out the more in-depth articles on getting started with Eagle schematics I linked to earlier. My own detailed journey from breadboarding to manufactured PCB is available at my website here.
Special one-day pricing available to customer and guest checkouts only. Prices expire at 11:59 p.m. on the day each post is published.
Via Westline T2B http://www.rssmix.com/

Comments
Post a Comment